


By Khoi Nguyen, P.E., GC. Professional Engineer, plan checker, licensed General Contractor.
Every guide on this topic tells you what a takeoff is, then spends the rest of the page selling you software. That's not what you searched for.
I've reviewed thousands of plan sets on plan check and bid hundreds of jobs off them. Below is the process I actually run, in order, with the scale check that catches the error most people never find, real waste factors by material, and a worked drywall takeoff you can copy.
How to do takeoffs from blueprints in 7 steps
A blueprint takeoff is the process of measuring quantities off a plan set so you can price them. You read the sheet index, set your scale, sort the scope into count, linear, area, and volume items, measure each condition, add waste, and reconcile the totals before pricing.
If you're new to the term, start with what a construction material takeoff is.
- Pull the full plan set, the specs, and every addendum issued to date.
- Read the sheet index and flag the sheets carrying your scope.
- Set the scale off a dimensioned wall, not the title block.
- Sort your scope into count, linear, area, and volume items.
- Measure one condition at a time across every sheet it appears on.
- Pull counts from the schedules, then check them against the plans.
- Add waste per item, reconcile the totals, then price.
The rest of this page is what happens inside each of those steps. On a 40 sheet residential set, steps 3 through 6 are where the hours go.
Before you measure anything, get the current set
Check the addendum log first. If Addendum 3 dropped Friday at 4pm and you take off Thursday's set, you measured a building that no longer exists.
I've watched a framing sub eat 40 linear feet of relocated bearing wall because he never opened Addendum 2. He bid the right building. It just wasn't the one being built.
You want four things open: the full plan set, the project manual or specs, the addendum log, and the bid form. The bid form tells you which line items the GC wants broken out, and that shapes how you organize the takeoff before you start rather than after.
Step 1: Read the sheet index before you measure
Sheet numbers aren't arbitrary. Under the U.S. National CAD Standard, the letter is the discipline and the first digit is the drawing type.
A is architectural, S structural, C civil, M mechanical, E electrical, P plumbing. The digit after it: 1 is plans, 2 elevations, 3 sections, 5 details, 6 schedules.
So A-101 is your floor plan, A-201 is elevations, A-501 is your wall type details, and A-601 is where the door and window schedules live. Once you know that, you stop scrolling through 60 sheets looking for the finish schedule.
Not every architect follows it. Residential sets from small shops often number sheets 1 through 12 with no logic at all. Read the index anyway, because five minutes there saves you from measuring off a demolition plan you thought was the new work plan.
Step 2: Set the scale from a known dimension, not the title block
This is the one that quietly ruins bids. Title blocks lie.
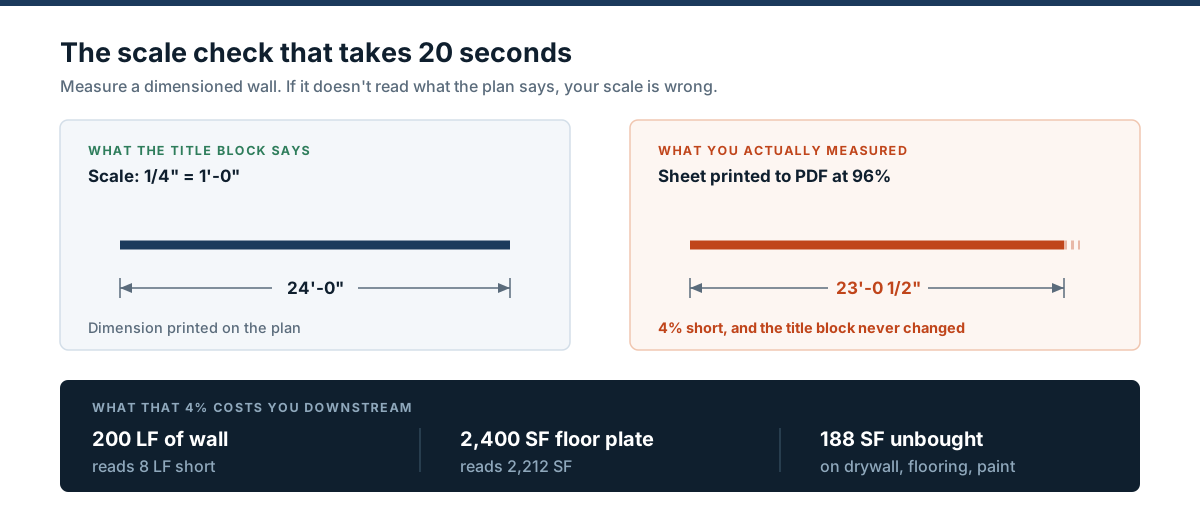
Somebody took a 24x36 ARCH D sheet, hit print to PDF with "fit to page" checked, and it came out at 96%. The title block still says 1/4" = 1'-0" because the title block is just text on the drawing.
So your scale reads right. Every number downstream is 4% short.
Here's the check that takes 20 seconds. Find a dimension string on the plan, something marked 24'-0". Measure it with your tool and see what it reads.
If a 24'-0" wall measures 23'-0 1/2", you're on a 96% print. Across 200 linear feet of wall that's 8 feet you never bought. On area it compounds: a 2,400 square foot floor plate reads as 2,212 square feet, and you're 188 square feet short on flooring, drywall, and paint before you've made a single mistake of your own.
Do this on every sheet, not once per set. Sheets get reissued individually, and a reissued sheet can come back at a different print scale than the ones around it.
If you're working in Plankore Pro, AI scale detection reads it per sheet, but I still spot check one dimension. Powered by AI, verified by you means you do the verifying.
Step 3: Sort the scope into measurement types first
Before you touch a measuring tool, split your scope into four buckets: count, linear, area, and volume. Everything you'll ever take off falls into one of them, and mixing them mid-sheet is how 14 doors end up measured in linear feet.
| What you're measuring | Unit | Takeoff type | Where it lives |
|---|---|---|---|
| Footings and slab | CY | Volume | S-100 series foundation plan |
| Wall framing | LF plates, EA studs | Linear + count | A-101 with wall types on A-501 |
| Drywall | SF | Area | A-101 plus wall types |
| Roofing | SQ (100 SF) | Area | Roof plan and A-201 elevations |
| Doors and windows | EA | Count | A-601 schedules, checked on plan |
| Base and casing | LF | Linear | A-101 plus finish schedule |
| Receptacles and fixtures | EA | Count | E-101 |
| Duct and pipe runs | LF | Linear | M-101 and P-101 |
Volume items catch people out. Concrete gets ordered in cubic yards, so a 40 by 60 foot slab at 4 inches thick works out to 2,400 square feet times 0.333 feet, divided by 27, which is 29.6 cubic yards.
Order 32 and you've covered subgrade variation.
Step 4: Measure one condition at a time, not one sheet at a time
Most people work sheet by sheet: open A-101, measure everything on it, move to A-102. That's how you end up with three different numbers for the same wall type.
Work by condition instead. Take every 2x6 exterior wall across the whole set in one pass, then every 2x4 interior partition, then ceilings.
Your hand stays in one measurement mode and your totals land in one bucket.
Color code as you go and never reuse a color. Blue for 2x6 exterior, green for 2x4 partition, yellow for shear wall. When the GC calls at 6pm asking where your framing number came from, you can point at the sheet instead of redoing the takeoff.
On big sets, use text search across the plans to find every sheet a condition appears on before you start measuring. Free Forever has document text search built in and it's free, so searching "shear" across 80 sheets takes a second instead of an afternoon.
Step 5: Count from the schedules, then check the schedules against the plan
Door and window schedules on A-601 give you the count, the size, the hardware group, and the fire rating. Start there, because counting doors off a floor plan means squinting at swing arcs.
Then go count them on the plan anyway. The schedule and the plan disagree more often than you'd think, usually because a door got added in a revision and nobody updated the schedule.
When they disagree, don't pick one. Write the RFI, and if it won't come back before bid day, carry the higher count and write the assumption into your bid.
A clarification line reading "Bid includes 15 interior doors per plan, schedule shows 14" costs you nothing and protects the number. On a 60 sheet commercial set I'd expect to find two or three of these.
Step 6: Add waste at the item level, not at the end
Slapping 10% on the total is lazy and it's wrong in both directions. Sheet vinyl doesn't waste like concrete does, and neither wastes like a cut-up roof.
| Material | Waste factor | Why |
|---|---|---|
| 1/2" drywall | 10% | Cutouts, offcuts at openings |
| Framing lumber | 10% | Crowned and culled stock, cut waste |
| Architectural shingles | 10 to 15% | Hips, valleys, starter, ridge cap |
| Ceramic tile | 10 to 15% | Diagonal layouts push it to 15% |
| Hardwood flooring | 8 to 10% | Run direction and board culling |
| Ready-mix concrete | 5 to 10% | Subgrade variation, over-excavation |
| Sheet vinyl | 15 to 20% | Roll width forces seam placement |
Cut-up roofs break this table. A simple gable roof runs 10%. A roof with four dormers, two valleys, and a cricket runs 18% and I've seen it hit 22% on architectural shingles.
Step 7: Reconcile before you price
Two checks before the numbers leave the takeoff.
First, sanity check the ratios. Drywall board area on a single story house runs about 3 to 3.5 times the floor area. If your 2,400 square foot house is showing 4,900 square feet of board, you counted partitions on one face instead of two.
Second, walk the perimeter. Add up your exterior wall segments and compare to the building footprint dimensions on the plan.
If they don't close within a foot, you missed a segment or double counted a corner. Only after both checks does the takeoff become an estimate, and then a bid, and those are three different documents.
A worked drywall takeoff from blueprints
Single story house, 40 feet by 60 feet, 2,400 square feet, 9 foot ceilings, 180 linear feet of interior partitions.
| Line | Quantity |
|---|---|
| Exterior walls, interior face only (200 LF x 9 ft) | 1,800 SF |
| Interior partitions, both faces (180 LF x 9 ft x 2) | 3,240 SF |
| Ceilings | 2,400 SF |
| Gross board area | 7,440 SF |
Now openings. Drywall subs don't deduct anything under 32 square feet, because the board still gets cut around the opening and the offcut is rarely big enough to use somewhere else.
So a 3'0" x 6'8" door at 20 square feet stays in. A 12 foot slider at 84 square feet comes out.
7,440 SF divided by 48 SF per 4x12 sheet is 155 sheets. With 10% waste, 171 sheets.
At $16 a sheet where I'm pricing today, that's $2,736 in board. Now here's the part that matters. If you'd counted those partitions on one face only, you'd be 1,620 square feet light, which is 34 sheets and roughly $544 of board.
But the board isn't the damage. At $1.75 per square foot to hang and finish, that same miss is another $2,835 in labor you didn't bid. One checkbox in your head, roughly $3,400 out of your margin.
That's the whole argument for traceability. Other tools hand you a number. You need to be able to trace every quantity back to the sheet it came from, because the miss never announces itself.
Common mistakes in blueprint takeoffs
Trusting the title block scale. Covered above. It's the most expensive 20 seconds you'll ever skip.
Measuring off an outdated set. Check the revision cloud and delta triangle on every sheet. A cloud with a 2 in the triangle means that area changed in Addendum 2.
Counting from the schedule only. Schedules go stale during revisions. Plans get updated first.
Forgetting the second face of a partition. The single most common quantity error I saw on plan check.
Ignoring the wall type legend. A 2x6 wall with R-21 batt and 5/8" type X on one side prices nothing like a 2x4 partition. A-501 tells you which is which and people skip it.
Rolling waste in at the end. A blanket 10% under-buys tile and over-buys concrete on the same job. Item level or you're guessing.
Any one of these on a $180,000 remodel is a four figure hole. The partition error alone ran $3,400 in the example above.
How long does a takeoff from blueprints take?
A 40 sheet residential set takes 4 to 6 hours by hand for a single trade. A multi-story commercial set with full MEP scope runs two to four days, and that's for an estimator who knows the building type.
Put a dollar figure on that. The Bureau of Labor Statistics put the median wage for cost estimators at $77,070 in May 2024, roughly $37 an hour before burden. Call it $55 fully loaded.
A five hour takeoff is $275 of estimator time before you've priced a single line. Bid ten jobs to win two and you've spent about $1,375 in estimating labor per job won. That's the real cost of the takeoff, and almost nobody carries it in their overhead number.
Where AI fits in a blueprint takeoff, and where it doesn't
AI won't do your takeoff. It'll do the first pass.
On a residential set, AI detection handles walls, areas, windows, doors, and scale. That's the mechanical part, the four hours you'd rather not spend on a Sunday. What it doesn't do is read the wall type legend and understand that the shear wall on grid line C needs blocking, or catch that the door schedule contradicts the plan.
Be skeptical of accuracy percentages in this category. Every one of them is vendor self-reported and none are independently checked. Ask instead whether the tool shows you the source sheet and the formula behind each quantity, because that's the thing you can actually check yourself.
One more practical note. Most established takeoff tools are Windows desktop software, so if your shop runs Macs you've historically needed a virtual machine or a second laptop. Plankore runs in the browser, so there's nothing to install on Mac, Windows, or a Chromebook.
Plankore's Free Forever plan needs no credit card, which covers area, linear, and count takeoff plus an estimating grid and Excel export in your own bid format. Compare that against the $1,749 and $2,999 per year seats on the pricing page before you buy anything.
What to do next
You've got the process. The question is whether your next takeoff eats 5 hours on a scale ruler at 9pm, or runs in a browser with every quantity traced back to the sheet it came from.
Start free and upload a plan set. When the quantities are solid, the next step is turning them into a bid.
Frequently asked questions
A blueprint takeoff is the process of measuring quantities off a construction plan set so they can be priced. Estimators pull counts, linear feet, square footage, and volumes for each scope item, then apply waste factors and unit costs to build the estimate and the bid.